Daisy Days
Size: 12” x 36”
Build Your Blocks
Cut 3 (12 ½ squares) for Block Base from your background fabric.

Cut 12 (4 ½ squares) of coordinating fabric for each corner.

Mark center from corner to corner for seam line, add corner triangles to block base with right sides together.

Sew along lines; flip over at seam and press. Cut away excess fabric under block.

Create 3 background blocks for your Daisies.
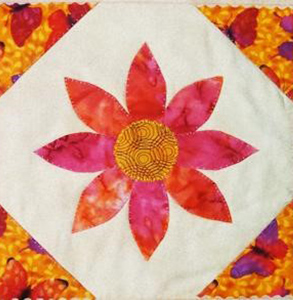
Making Daisy’s
Remember to use your Teflon sheet to protect your iron and ironing board cover.
Each block will have a daisy fused to the center. To find center, fold block in half and half again.
Finger press, this will give you a center for your daisy.

From design page, trace 8 petals and one center onto paper side of fusible for each flower.

Iron paper backed fusible web with traced design to the back of your chosen fabric. Cut out pieces along pattern line.
Remove Paper from fabric.
Place daisy center on center of background block. Place petals evenly around center. Line petals ¼” under the flower center.
** When you are happy with your layout, press to apply pieces to your background following the directions of you chosen fusible web**
Using a decorative stitch, cover the edges of your fused applique. For this piece I used a blanket stitch.
Piece it Together
Square your blocks, each should measure 12 ½”
Combine blocks in a Row matching points at the edge of the blocks.

Finishing
You will need to layer your runner with batting and backing.
Cut batting and backing allowing 2-3 inches extra on each side. Layer your quilt top and baste as desired.
Add quilting as desired.
Square up your quilt and add binding and Enjoy!!!
Finished Project

Happy Quilting,
Karen