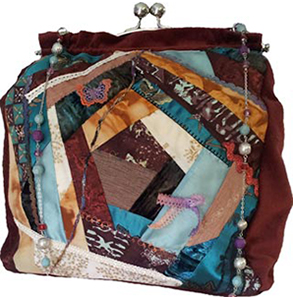
Easy Elegance Crazy Quilt Bag Purse

Materials
- Two 12 inch muslin squares
- Assortment of scraps of cottons, velvets, silks, and silkies to complete crazy quilt blocks.
- Assortment of lace, trims, buttons, ribbons and threads for embellishing bag.
- ½ yd fabric for bottom, sides and handle pocket. I use a heavier weight fabric like duck cloth or velvet.
- ¾ yd lining.
- Made for use with steel frame LACIS-Metal Purse Frame with Ball Clasp and Loops 10”
Create 2 crazy quilt blocks
- Finished size : 12 inch x 12 inch square
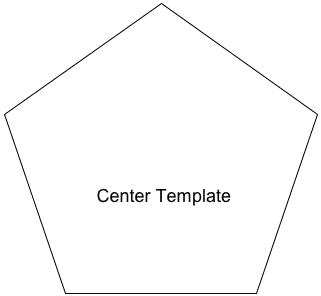
- Using template below, cut two center fabrics.
- *You may want to cut your template out of plastic.

 Creating Your Crazy Quilt Block
- Place one center fabric right side up on center of muslin foundation.
- Place second fabric piece right sides together over first piece, aligning one edge. Sew ¼ inch seam.
- Trim seam allowance to a scant 1/4 inch. Press fabric open.
Trim back any excess fabric. Your block will now look similar to this.

Layer next piece over another side of center, be sure that when you stitch them together you will totally enclose one side of the first piece. Make sure to not leave muslin showing between sewn pieces. Trim and press fabric open.

 When covering the muslin foundation, work around the center in a circle.
It is best not to jump from one side of your block to the other.
Continue to sew and flip around block until all foundation is completely covered. Trim your blocks to 12 inch square. Create a total of two blocks.
Embellish with threads, lace, and trims as desired.
Purse Body
- Crazy blocks will now be referred to as Piece(s) A.
- Piece (s) A two 12 inch crazy quilt blocks.
- Piece (s) B cut two 3 inch x 28 ½ inch strips for purse sides.
- Piece C cut one 5 inch x 12 inch piece for bottom.
- Using a ¼ inch seam, sew Piece C to Piece(s) A as shown in layout.
- Sew Piece(s) B to each side of A/C.
- Add batting and quilt or fuse if extra thickness is desired.

Create Handle Pocket
- Cut two strips 12 ½ inch x 3 inch

- Fold over 1 inch on short end of strip to wrong side of fabric. Sew ends with matching threads and press.

- Fold in half-lengthwise, wrong sides together (right sides showing) and press.

- Place each handle pocket over the center of the right side of the purse body, baste raw edges together.


Form Bottom of Bag
On the wrong side of each bottom corner, pull out to flatten into triangle to form point.
Mark a line 2" in from point and sew across line.
 Form Lining
- Cut one piece of lining 16 ½"(w) x 27 ¾"(L)
- Add pockets as desired. I added 4 pockets to the inside of my purse.
- To create a pocket, cut size desired and turn under
- edges ½ inch and press. Top stitch pockets to desired area
- of right side of lining.
- Fold long side of lining in half, right sides together. Using a ¼ inch seam sew one side top to bottom. Sew second side leaving a 4 inch opening. Lock seams at opening. This opening will be used later to turn out purse.
- Create bottom of lining by following steps above for form bottom of bag
Sewing Lining and Bag together
- Holding lining with wrong side out, insert bag right side out into lining.
- ** The two right sides of purse and lining should be touching inside.
- Matching side seams of purse and lining: Using a ¼ inch seam. Sew completely around top edge of purse.
- Turn right sides out by pulling purse through the 4 inch opening left in lining.
- Now that your purse is turned, we need to create the pocket for the handle.

- First, press out the top of purse and topstitch the upper edge.
- With handle pocket exposed, sew ½ inch from edge to edge of handle pocket. Backstitch or lock seams.

Your purse is now ready for wear. Unscrew purse handle and slide rods through pockets.
Once your rods are in place tightly screw back into place. When in place the frame sits on the outside of the purse.

Loops on the top of the frame allow for a shoulder strap if desired.
Enjoy! Make another for a friend.
Happy quilting with Juki!
Karen