In the Pines
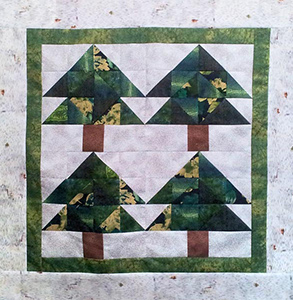
This Quilt uses only 4 easy Pine Tree Blocks created from Half Square Triangles.
Cutting
- Create 4 Pine tree Blocks
- Cut (8) 3 inch squares from background fabric.
- Cut (5) 3 3/8 inch squares (for half square triangles) of each of the 4 green tree fabrics.
- Cut (12) 3 3/8 inch squares from background fabric.
- Cut (8) 4 ½ x 3 rectangles from background fabric.
- Cut (4) 2 ½ x 3 rectangles from tree trunk fabric.

Follow the instructions below to create your half square triangles.
Making Your Half Square Triangles
- Stack 12 squares with one background and one green.
- Stack 8 squares with two different green tree fabrics.
- Mark one fabric from corner to corner

- Layer two fabrics with right sides together

- Mark sewing lines ¼ inch from center line on each side and sew. If using a ¼ inch foot you can just sew ¼ inch on each side of the center drawn line.


- Continue until you have used all the cut strips from this group. We will call this Set B.
Sub-cut each of Set A and Set B into 3 ½ inch blocks, these blocks will be your rail fence border.
You will need a total of 30 rail fence blocks. - After sewing the two seams, cut down the center on original drawn line.

- Press open, you have created two half square triangle blocks.

- To complete your tree blocks you should create a total of 24 green with background half square triangles.

- 16 green with green half square triangles.

Layout and Assembly of the Pine Tree Blocks
- Create rows by sewing half square triangles together using the diagram below.
Use one background square, two half square triangles of green and background and one background square.
- For the next two rows, use one half square triangles of green and background and two green and green half square triangles and another green and background half square triangle.


- Sew Bottom row with one rectangle background strip, one tree trunck fabric and another rectangle background strip.

- Press and assemble strips into your Pine Tree Blocks
- Assemble Your 4 blocks together.
Finishing Your In The Pines Quilt Top
Double Borders (remember always measure your quilt top to make sure the borders will fit properly)
Border 1
- Cut strips 2 inches wide from 1st border fabric.
- Measure quilt top and cut side borders to fit side length
- Sew borders to both sides of quilt using a ¼ inch seam
- Now measure quilt top and cut top borders to fit top and bottom
- Sew borders to top and bottom of quilt using a ¼ inch seam
Border 2
- Cut strips 3 ½ inches wide from border fabric
- Follow the same instructions as border 1 to add border 2
Quilting
- Cut batting and backing 2 to 3 inches larger than your quilt top.
- Layer your Tree of Life quilt top with batting and backing.
- Top stitch raw edges of fused pieces and add additional quilting as desired.
- Square up your quilt and add binding and sleeve. Hang on the wall or lay on your bed and admire.

Below is another quilting project mixing and alternating the diagonal half square triangles technique we just demonstrated with plain square shapes.
Happy Quilting!!!!
Karen